A Gentle Introduction to Flutter & Dart with a Simple Mobile Application Project
I'm sure must of us have heard about flutter and dart before, but if you haven't you're in the right place. Flutter & Dart is basically used to make cross platform mobile application(IOS & Android), website and desktop application. The aim of this article is to give you a brief overview of flutter and dart while creating a simple project to get the basic idea of what this technology is alright on to it
You don't have to have any previous knowledge of mobile development to follow this guide the only thing needed is to have flutter installed on your system you can follow the link to Install Flutter even if you don't have flutter installed you can go through with the article to get the basic idea of how to create applications with it
Table of Content
- What is flutter and Dart
- Creating a Flutter and Dart Project
- Understanding Project Structure
- Running our Boilerplate Application
- Creating our Simple Mobile App
- Creating the Background Layout
- Add Image Into Our Application (pubspec.yaml)
- Adding & Styling Text
- Conclusion
What is flutter and Dart
let me start by giving you the definition from their official websites
Flutter is Google's UI toolkit for building beautiful, natively compiled applications for mobile, web, desktop, and embedded devices from a single codebase -flutter.dev
Dart is a programming language designed for client development, such as for the web and mobile apps. It is developed by Google and can also be used to build server and desktop application -Wikipedia
As you can see flutter in itself isn't a programming language dart is. Flutter is described as a UI toolkit which it is. Flutter gives you certain premade components know as widget for you to easily create a layout it's kind of like Word Scramble where you're given different letters to construct a word, you can construct any word with the letters and that's exactly what flutter is you are given different widgets which can be used to create any sort of interface you like
Dart like we've mention is the programming language that provides logic for your application i.e when you tab on a button what should your application do
Creating a Flutter and Dart Project
To create a new project in Flutter and Dart is very simple all you need to do is navigate to your terminal and run
flutter create app_name
where the app_name is the name of your project. That's it you've created your first flutter project The name of my app would be simple app so i'll run
flutter create simple_app
I'll be using android studio for development but it's just my personal preference you could as well use visual studio code
Understanding Project Structure
After creating a project in flutter with the flutter create command a folder is created with the name we give it in my case it was simple_app opening the project in a android studio we see the following
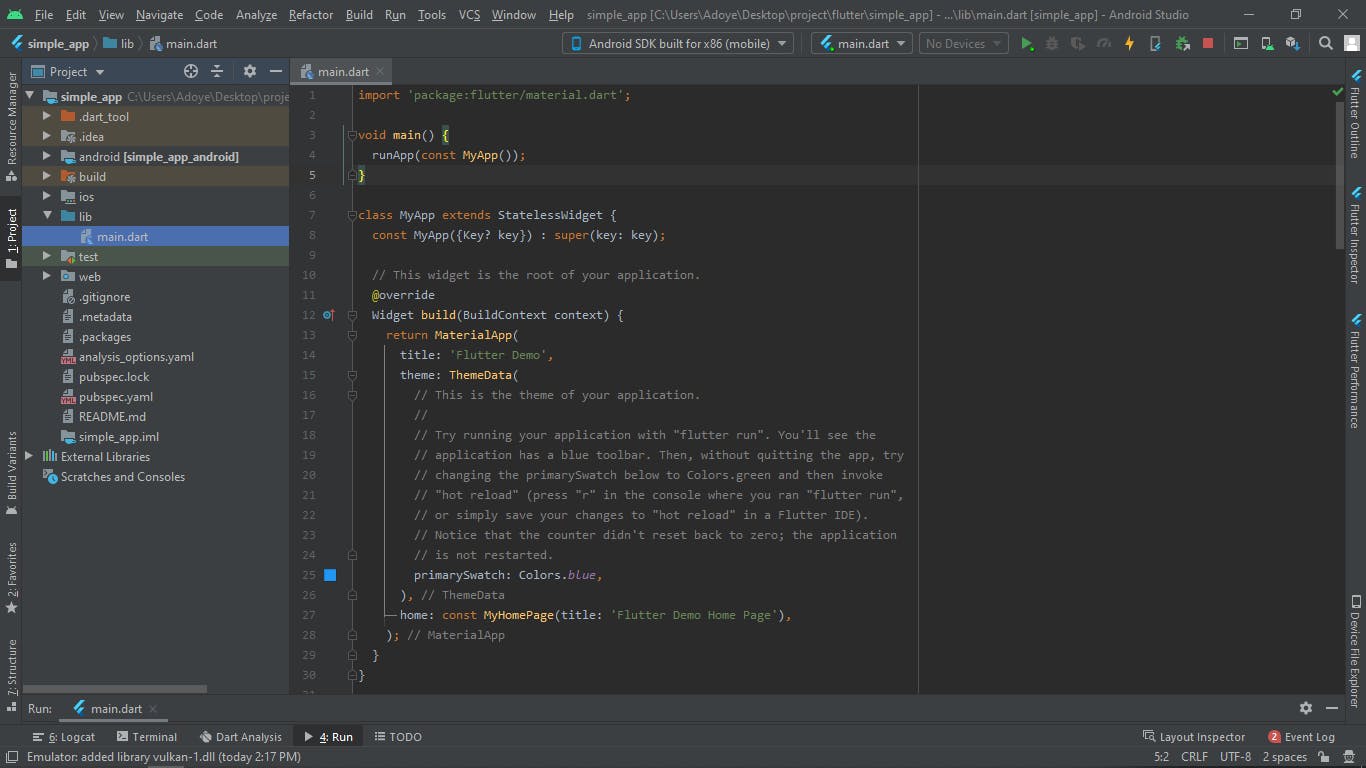
Inside the simple_app project we can see there are a lot of sub-folders generated for us once we create a new project we are only interested in the lib/main.dart file and 99% of the time you work with flutter and dart is going to be spent here, In future article we'll explore the other folder but to create our application we don't need to worry about any other folder except this one here is where we will be writing all our code.
Running our Boilerplate Application
If you've been following along you'll notice there's a bunch of code written in the main.dart file it's the starter demo code you get anytime you start create a new project if you're into web development it's similar to how react generates the starter code anytime you create a new react app. we'll be writing our own code from scratch so we don't need to worry about it so much
To start up this application we navigate to the AVD Manager at the top right of the screen clicking on it we'll see another window open in android studio with some devices you've previously installed if you haven't set up any device in the AVD manager you can click create virtual device and set up a device easily after you're done click on the play button in the actions tab to launch emulator
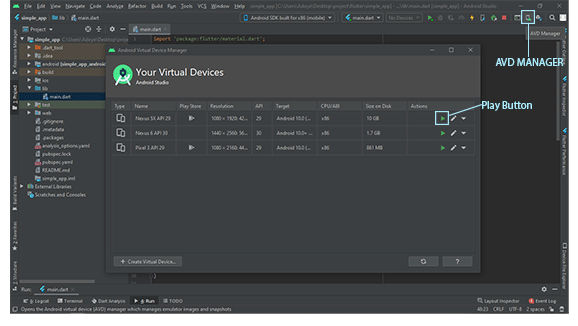
Now the emulator should have launched you should be able to access it in the drop down menu located at the flutter device section on default it'll switch to the emulator so if yours doesn't it's worth checking after that clicking the run button or shift+F10 will run the application on your emulator, the application will take a couple of minutes to build so be patient once that's done you should have something like this
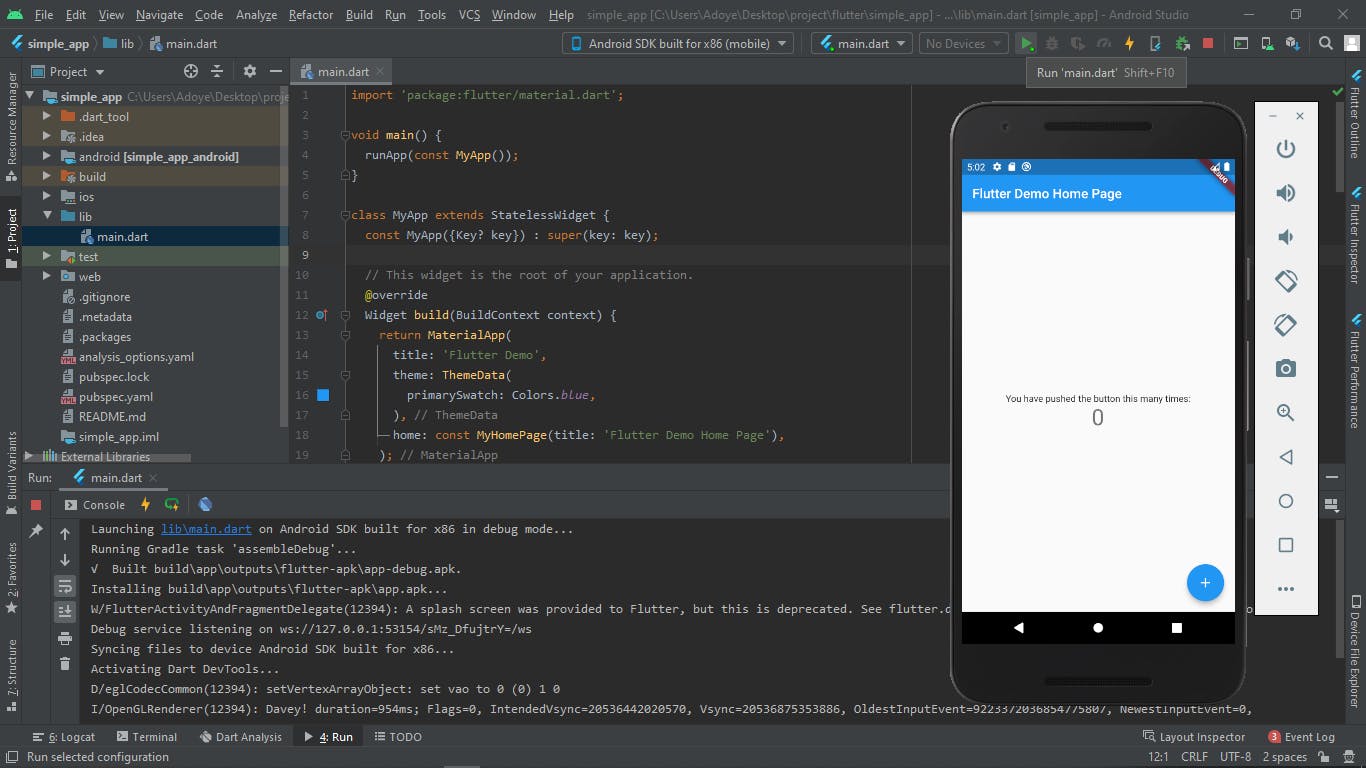
This is the default counter application that comes with creating a new project clicking on plus icon on the phone should increase the number displayed
Creating our Simple Mobile App (FitGurus)
we'll be breaking the app into 4 different simple steps to understand how to create apps with flutter & dart easily
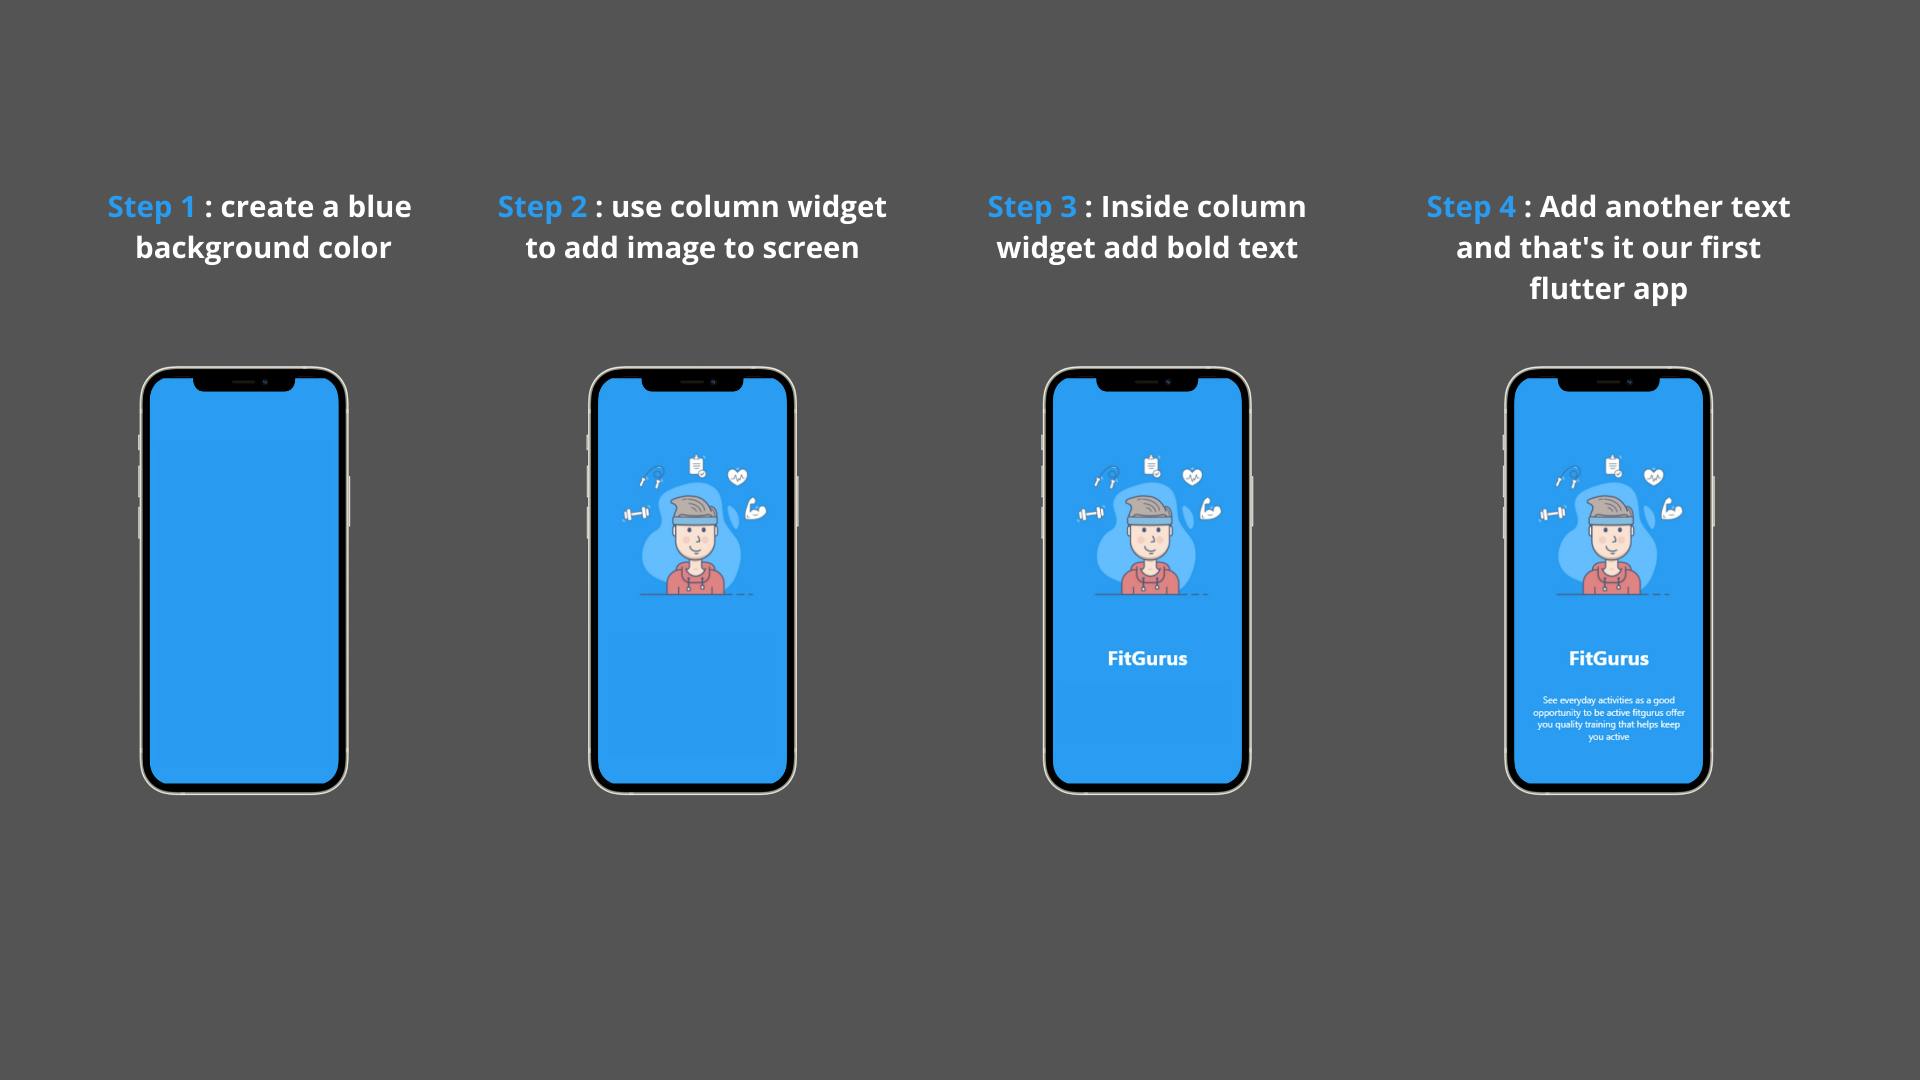
Step 1 : Creating the background layout
import 'package:flutter/material.dart';

void main() {
  runApp(const MyApp());
}

class MyApp extends StatelessWidget {
  const MyApp({Key? key}) : super(key: key);

  // This widget is the root of your application.
  @override
  Widget build(BuildContext context) {
    return MaterialApp(
      title: 'Flutter Demo',
      home: Scaffold(
        backgroundColor: const Color(0xff2B9CF2),
)
Inside our main.dart file we import the material widget this is shipped with the project when you create a new flutter project 99% of the time you'll be making use of the material widget although it's not a must you stick with it, using it to conveniently wrap your app allows you to make use of some of the inbuilt material design as and also access to the navigator which is used in helping you access different screens in your app
Next we call our main function which is the most important and mandatory part of any Dart Program it servers as the entry point of our app anyone if you've worked with languages like java it similar to the public static void main method, The main method executes myApp class which extends a statelesswidget the statelesswidget is used when we don't need to keep track of any data in an application the state of the app is the same at all times
Next we have a constructor const MyApp({Key? key}) : super(key: key); which is really not necessary if you remove this line of code your app still works I only left it there because the dart compiler kept warning me
The widget build method is where all the magic happens everything we've been doing so far is kind of like set up this method is what makes us see changes in our application we specify the title and the background colour of our app here the scaffold widget houses the background colour of our app and we're done with step 1
Step 2 : Wrap image in column widget
To include an image in your application we first create a directory and name it Images next we include the image taken into the directory
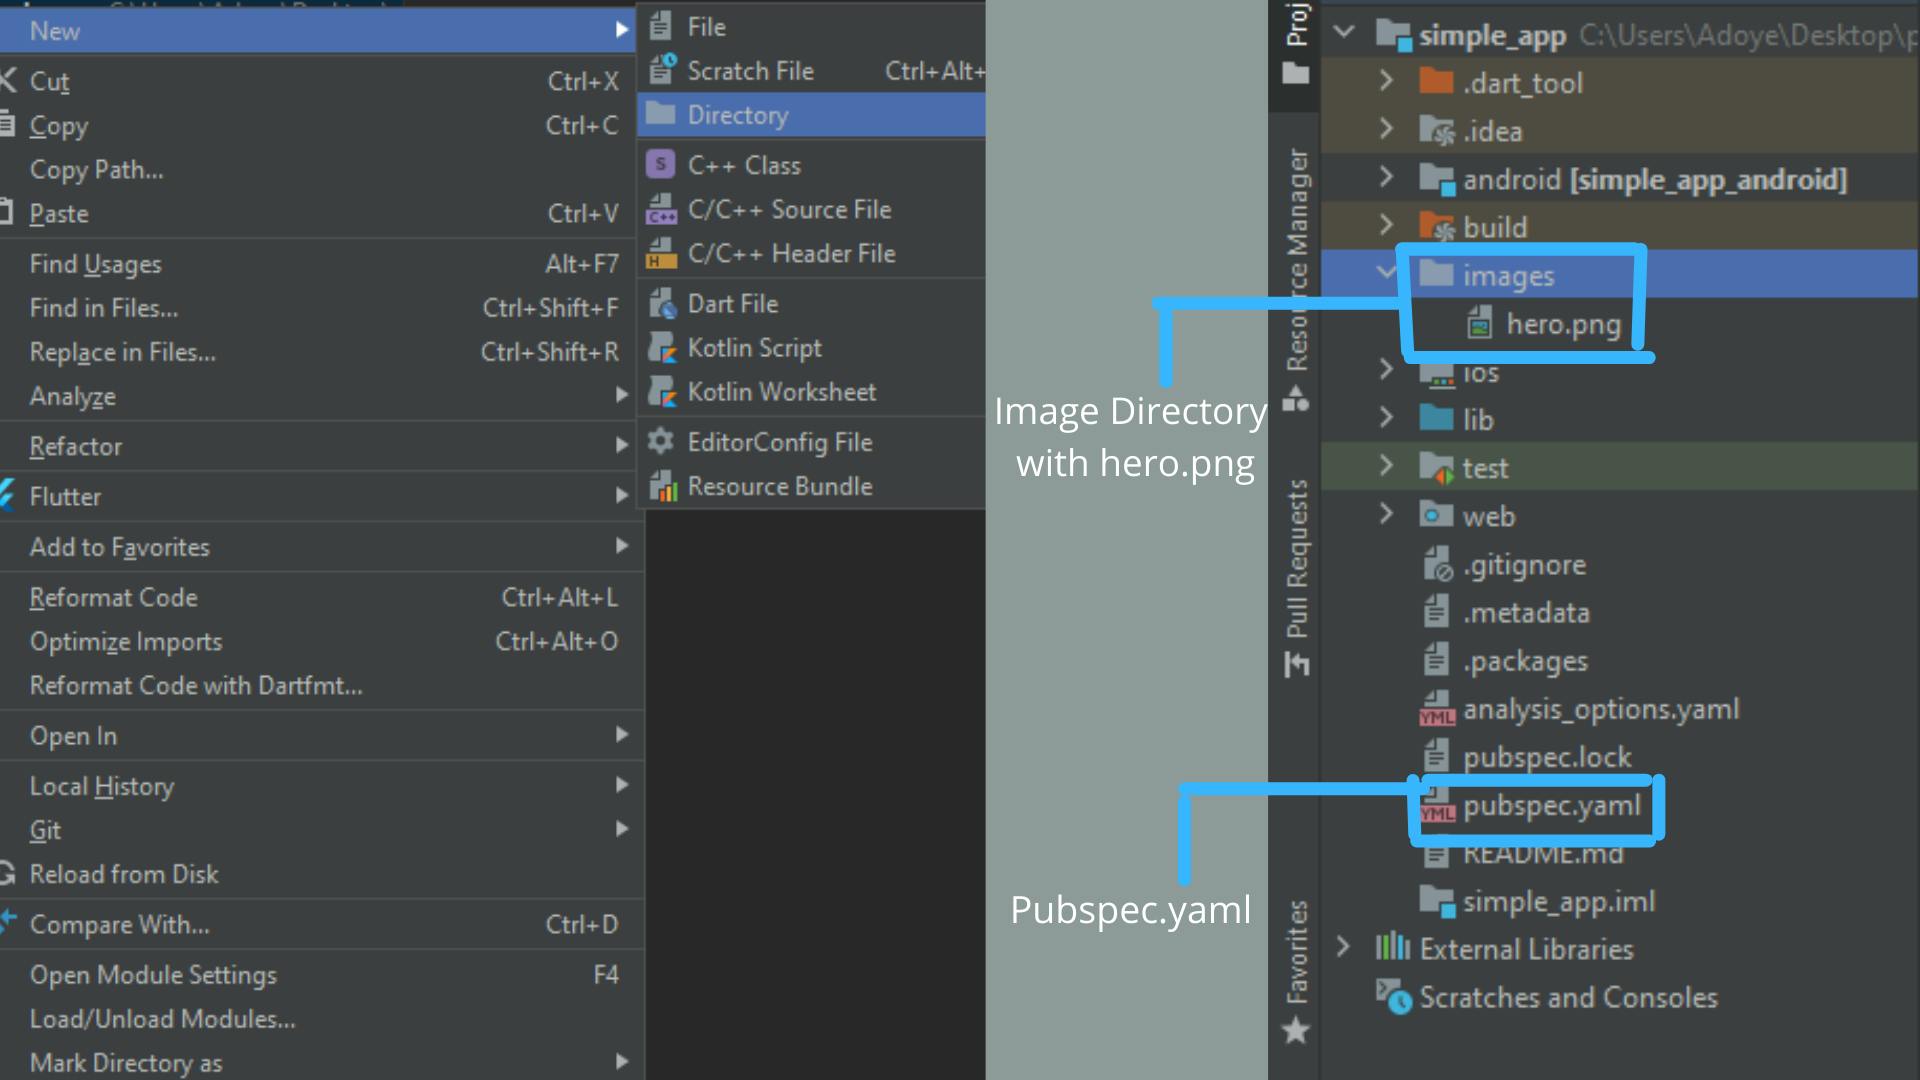
next navigate to
pubspec.yamlfile and make the following changes scroll to where you'll find assets modify that section with name of your directory and name of the image in my case it was images and the name of the picture was hero.png
  # The following line ensures that the Material Icons font is
  # included with your application, so that you can use the icons in
  # the material Icons class.
  uses-material-design: true

  # To add assets to your application, add an assets section, like this:
  assets:
     - images/hero.png
  #   - images/a_dot_ham.jpeg
Make sure to click pub_get to update the file save and inside main.dart we write the following code to add an image in our app
import 'package:flutter/material.dart';

void main() {
  runApp(const MyApp());
}

class MyApp extends StatelessWidget {
  const MyApp({Key? key}) : super(key: key);

  // This widget is the root of your application.
  @override
  Widget build(BuildContext context) {
    return MaterialApp(
      title: 'FitGurus',
      home: Scaffold(
        backgroundColor: const Color(0xff2B9CF2),
        body: Column(
          mainAxisAlignment: MainAxisAlignment.center,
          children: const <Widget>[
            Image(
              image: AssetImage('images/hero.png'),
            ),
          ],
        ),
      ),
    );
  }
}
There's practically a widget for everything in flutter, actually everything in flutter is a widget if our app had elements side by side we'll have made use of a row widget
Step 3 & step 4 : Add Text and Basic Styling
import 'package:flutter/material.dart';

void main() {
  runApp(const MyApp());
}

class MyApp extends StatelessWidget {
  const MyApp({Key? key}) : super(key: key);

  // This widget is the root of your application.
  @override
  Widget build(BuildContext context) {
    return MaterialApp(
      title: 'FitGurus',
      home: Scaffold(
        backgroundColor: const Color(0xff2B9CF2),
        body: Column(
          mainAxisAlignment: MainAxisAlignment.center,
          children: const <Widget>[
            Image(
              image: AssetImage('images/hero.png'),
            ),
            Text(
              'FitGurus',
              style: TextStyle(
                color: Colors.white,
                fontSize: 30,
                fontWeight: FontWeight.bold,
              ),
            ),
            SizedBox(
              height: 20.0,
            ),
            Padding(
              padding: EdgeInsets.only(left: 30.0, right: 30.0),
              child: Text(
                'see everyday activities as a good opportunity '
                'to be active fitgurus offer you quality training '
                'that helps keep you active',
                style: TextStyle(
                  color: Colors.white,
                  fontSize: 20.0,
                ),
              ),
            ),
          ],
        ),
      ),
    );
  }
}
For the final step we make use of two text widget which are separated by a SizeBox widget it is used to create a space between the two text adding all three widget into the column so they are all stacked vertically the text widget takes a string and you use the property style to control the look of the text in both text we changed the color to white and increased the font size for more info about all widget and property make sure to visit widget catalog
Conclusion
That's it we are done creating our simple app I hope this introductory guide gave you a good overview of flutter and dart and allowed you see how easy it is to build application with flutter and dart in this article we covered the following
- What is flutter & dart and some use cases
- Creating a flutter and dart project using
flutter create app_namecommand - Project structure of flutter and dart application
- Created a simple application in flutter
- How to add image assets in our app using
pubspec.yamlfile - Understood stateless widget & made use of column, text, image widget
You can get the link to the complete project here FitGurus
